
Log in and select Apply to Shows from the menu. The Apply to Shows page is a list of events that are currently accepting applications. For a full list of events on ZAPP, see the Events List.
Frequently Asked Questions
Looking for something specific? Click on one of the following to jump to the section.
Using ZAPP
Once you click on an event name, you will be taken to the corresponding Event Information page. If you do not see the “Apply to this Show” button at the top of the page, it is for one of the following reasons:
- The application deadline has passed.
- You have submitted the maximum number of applications the event allows.
The full view, available only on desktop computers, displays the name of every event with an event start date, application deadline, or application open date in the selected month. The compact view, available on both desktop and mobile devices, gives an overview of the month’s activity. Full event cards are listed under the calendar for the day selected in both views.
Statements of technique are saved in your Portfolio. To save a statement of technique, go to your Portfolio and click the toggle to switch from the “Artist Portfolio” to “Saved Statements.”
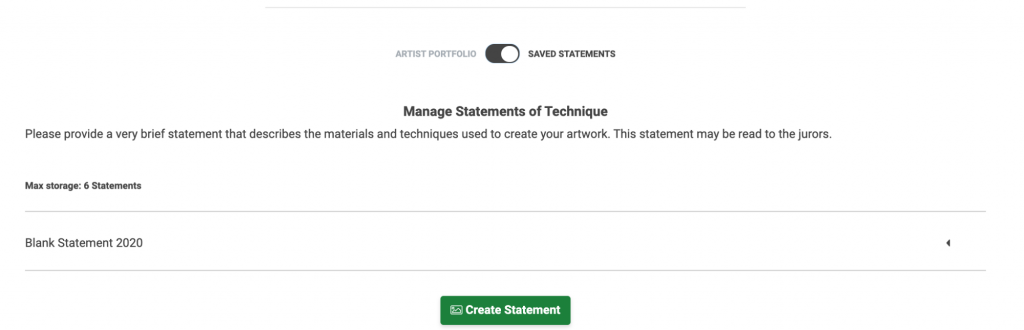
Click the green “Create Statement” button to write and save a new statement. For a full guide on saving statements of technique, see our guide on Uploading Images & Saving Statements.
My Account
To reset your password, click Forgot Password? to send a password reset link to the email address associated with your account.
To retrieve your username, click Forgot Username? to send your username to the email address associated with your account.
ZAPP accounts are disabled after 24 months of inactivity. If your account is disabled, please email contactzapp@westaf.org for assistance.
Update your email address at any time by following these steps:
- Log in to your account
- Click My Profile through either the header of ZAPP or the menu
- The page will open on Contact Information
- Enter your new email address in the Email Address field.
- Click Save
Keeping your email up to date ensures you never miss an event update and can always gain access to your account.
Add team members and/or associates through your ZAPP profile.
- Click My Profile through either the ZAPP header or the menu
- Scroll to the bottom of Contact Information and choose “Team” next to the question, “Are you an individual or a team?” and “Yes” next to the question “Do you work with associates?”
- Select Teams & Associates
- Enter your collaborator’s name
- Enter up to three associates
- Click Save
Artist accounts are designed for those who intend to show and sell their artwork at events. Non-artist vendor accounts are designed for other vendor types (such as event sponsors or food vendors). Some events may accept both types of applicants on one application but only require images from artist applicants.
Be sure to select the correct account type on your Profile under Medium Selection.
Go to your Profile and select the Medium Category drop down. Once you have opened the Medium Category drop down, you will have the ability to identify as either an “Artist” or a “Non-Artist Vendor.” Depending on the account type you select, you will have different disciplines or categories to choose from.
You can unsubscribe from all ZAPP system emails; however, we email important notices about system maintenance, new features, and site issues so we recommend staying subscribed to the “System Information” email list.
To unsubscribe, click My Profile through either the header of ZAPP or the menu. Find the “Email Notifications” section and uncheck any or all communication boxes. Click Save to ensure your preferences are updated. Unsubscribing from ZAPP emails will not prevent event administrators from emailing you application updates.
My Applications
Yes! So long as you save your work before leaving your application, it will retain previously entered information. To finish an application you started, go to My ZAPPlications and click the Complete button associated with the started application.
Yes! Follow these steps to add a team member to your account:
- Click My Profile through either the header of ZAPP or the menu
- Scroll to the bottom of Contact Information and choose “Team” next to the question, “Are you an individual or a team?”
- Select Teams & Associates
- Enter your collaborator’s name
- Click Save
Events that require an access code are allowing submissions by invitation only. They are not open to the general public. To apply, simply enter your access code into the Access Code text box and click “Apply” to start the application.
If you have been invited to apply to the event but have not received an access code, email the event for more information.
Some events do not collect images. If you have questions about the application process for an event that is not collecting images, we recommend reaching out to the event organizers for more information.
The order you select your images in determines the order they are viewed by the jury. If a booth shot is required, it will always be last. If you wish to change the order, simply deselect and reselect the images in your desired order or click Change Image Order and drag and drop your images into the desired order.
To review your application images as a juror, you will first need to be using ZAPP on a computer—previewing an application as a juror only works on desktop devices.
Once logged in, find the application you want to preview and select “Review.” On the Application Preview page, click “Preview as Juror” and the site will open a pop up window that will show you how jurors will see your images.
The Application Preview page, and the option to preview your application as a juror, will also display after you have completed your application, but before you advance to checkout. Always review your application before paying the jury fee and submitting it!
Certain shows on ZAPP allow artists to apply multiple times though each have their own rules regarding multiple submissions. Be sure to check the event’s prospectus before submitting an additional application.
- In order to submit another application, select the show you wish to apply to again from your My ZAPPlications page.
- Click the “Apply to this Show” button and fill out the application.
- Purchase the application fee to submit your application.
Once you apply to an event on ZAPP, your application, and its current status, will be listed on the My ZAPPlications page. If you do not see the application on your My ZAPPlications page, it’s possible that you have multiple accounts with ZAPP and the application is associated with an alternate account.
To find out if you have multiple accounts and to retrieve a list of your usernames associated with a specific email, fill out the Forgot Username? field on the Login page. If you still need assistance locating your application, email us at contactzapp@westaf.org for assistance.
- Started: You have started the application but have not submitted it to the event.
- Ready for Submission: Your application is completely filled out and is ready to submit. The event has not received your application and cannot view your application until pay the application or jury fee and submit your application.
- Awaiting Payment by Check: The event has received your application and is waiting for your check payment. Check payments should be mailed directly to the event.
- Received: You successfully submitted your application. The event has received the application.
- Incomplete: The event administrator is requesting or allowing you to make modifications to your application. You can re-submit without incurring additional application/jury fees
- Exception: The event administrator is requesting or allowing you to make modifications to your application after the application deadline. You should re-submit before the jury process begins.
- Withdrawn: Your application has been withdrawn from consideration.
- Jury in Progress: The jury process has started. Applications are being scored.
- Invited: The event has invited you to participate.
- Not Invited: The event has not invited you to participate.
- Accepted: You have accepted the event’s invitation to participate.
- Declined: You have declined the event’s invitation to participate.
- Confirmed: You have purchased a booth and/or confirmed your intent to participate in the event.
The list above reflects the way these statuses are typically used; however, events may have different processes. Contact the event directly if you have questions about your application status.
Each event has its own policy about opening applications after submission. If you would like to edit your application before the application deadline, contact the event administrator and request that your application status be changed from Received to Incomplete. This will allow you to go back into your application and make changes to text and/or images. You will not be required to pay the jury/application fee again upon re-submission.
Once your status is in Incomplete:
- Click “Complete” under the application.
- Make any requested and/or desired edits.
- Click “Save and Preview.”
- Click “Re-submit” to move your status back to Received.
Archiving applications is an easy way to help organize your My ZAPPlications page. Applications can be archived after the event has passed or if your application is in the Not Invited or Withdrawn statuses.
- Go to My ZAPPlications.
- Find the application you wish to archive and click “Archive.”
- Select any additional applications you wish to archive.
- Click “Archive Selected Entries.”
- If you archived an application by mistake or want to unarchive an application, email us at contactzapp@westaf.org.
My Purchases (The ZAPP Shop)
Contact the event administrator. While payments are made through ZAPP, the funds collected belong to the events and event administrators must authorize the refund.
If the event organizer does not respond, please contact ZAPP at contactzapp@westaf.org before initiating any payment disputes so we can reach out on your behalf. Credit card disputes, without first communicating with our team, can jeopardize your account and standing with ZAPP.
Go to your Profile and click on “Saved Payments” to open the dropdown. You will then see any payment methods already saved in ZAPP and you have the option to add a new payment method.
To update a saved payment method, click the “Edit” button. To delete a saved payment method, click the “Delete” button.
Once you have received a coupon code from the event, you can apply the discount during the checkout process within the ZAPP Shop, under Step 3: Add Coupons. For a full guide on using coupon codes, see How to Checkout with a Coupon Code.
I don't have the option to accept my invitation or purchase products in the ZAPP Shop. What do I do?
If you have been invited to a show but do not have the ability to accept an invitation or purchase booth products, it is likely a setting on the administrator’s end. Email contactzapp@westaf.org with the name of the event and we can reach out to the administrator with more information.
The checkout section displays all of the products you are eligible to purchase until the event’s purchase deadline. You can view your purchases by going to My ZAPPlications and sorting by Payments Made. Clicking on a transaction will bring up your receipt, which was also sent to the email address associated with your ZAPP account.
Payments made by credit card on ZAPP will show as being sent to ZAPP Software, LLC since ZAPP collects payments on behalf of event administrators. However, all funds collected on ZAPP are the property of the respective organizations using our application management software and all decisions regarding funds collected are made by each event’s organizers.
Uploading Images
First, check that you have formatted your image according to the ZAPP specifications. These requirements exist to help ensure your images appear equitably for the jury.
Image Specifications
- At least 1400 pixels, preferably 1920 pixels, on the longest edge
- Under 5 MB
- File types accepted: JPEG, JPG, PNG, TIFF, BMP
- Between 72 and 300 dpi
You can also review our Uploading Images help page for more information.
Deleting images frees up space in your portfolio and will not remove the image from any application it is attached to.
- Select My Portfolio from the menu.
- Click on the image you wish to delete.
- Click on the “Delete” button.
- When the pop up appears, click Yes.